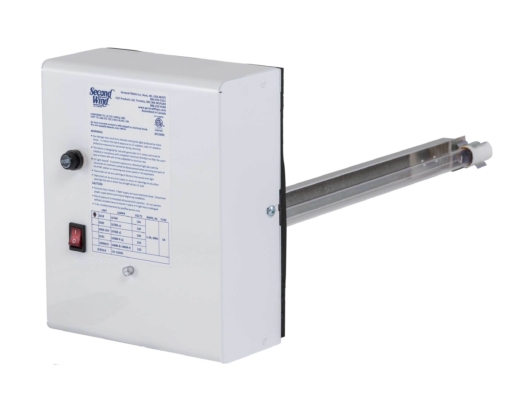
GeneralAire SF-2018 Air Cleaner -120 VAC / 18″ Single Lamp
Model# SF-2018, GeneralAire Air Cleaner.
PRODUCT INTRODUCTION / BENEFITS:
( Model SF-2018 >Effective up to 1700 sq. ft. homes )
( Model SF-2000 >Effective up to 4000 sq. ft. homes )
The Second Wind UVC PCO air purifier is specifically designed to be connected to a residential HVAC system (gas furnace / air handler).
With a powerful 18” UV-C / PCO germicidal / oxidizing lamp, the Second Wind air purifier will destroy chemical and biological contaminants, as well as odours throughout your home.
IMPORTANT: Must be wired to 120 volts constant power.
Installation Instructions:
- Materials Furnished (SF-2018) : One 18” UVC lamp (P/N: SF-1076R), One Second Wind 120 Volt Air Purifier, 6 ft power cable, mounting template, qty. 4 self tapping 5/16” screws, instructions.
- Materials Furnished (SF-2000) : Two 18” UVC lamps (P/N: SF-1076R x 2), One Second Wind 120 Volt Air Purifier, 6 ft power cable, mounting template, qty. 4 self tapping 5/16” screws, instructions.
- Materials NOT Furnished: 120 volt power extension cable (if required)
- Tools Required: Electric drill, ⅛” drill bit, tin snips, 5/16” magnetic nut driver, eye protection, safety gloves, tape measure, marker, Philips screwdriver.
- Carefully inspect the UV lamp(s) for any damage.
- Refrain from touching the glass. Handle lamp by the porcelain end caps.
- Determine optimal mounting location within your HVAC system.
- Ensure depth lamp clearance minimum of 18” as lamp extends 16″.
- If installing on the supply plenum (hot side), ensure the air purifier is installed at a minimum of 6” above the AC Coil.
- Temporarily attach included template with tape to desired location of HVAC wall. Ensure template is level.
- Drill qty. 4 ⅛” holes for mounting screws, as per template.
- Drill qty. 1 ⅛” hole to identify the centre of the lamp hole.
- Remove template.
- Cut out the lamp hole: Either a 3” round hole or a 3” wide by 2” high rectangular cutout
- Carefully mount and secure air purifier with the 4 provided self tapping screws.
- Carefully install lamp assembly into lamp hole.
- Secure lamp assembly into position with the two wing nuts provided.
- Securely connect 4-pin lamp connector(s) to lamps.
- Close the air purifier cover with locking screw located on case enclosure.
- CAUTION: NEVER EXPOSE EYES OR SKIN TO UV LIGHT.
- Connect to 120 volt constant power.
- Press ON/OFF switch to ON position. The sight glass will now illuminate.
- Affix an installation date sticker to air purifier, indicating lamp replacement date.
- Replace lamp every 2 years.
Downloads of GeneralAire Air Cleaner:

Reviews
There are no reviews yet.